Rather than default user interface of android RadioButton, we can also implement a custom radio button. Custom RadioButton makes user interface more attractive.

Example of Custom RadioButton

Let’s see an example of custom RadioButton.

activity_main.xml

File: activity_main.xml

<?xml version=“1.0” encoding=“utf-8”?>
<LinearLayout
    xmlns:android=“http://schemas.android.com/apk/res/android”
    xmlns:tools=“http://schemas.android.com/tools”
    android:layout_width=“match_parent”
    android:layout_height=“match_parent”
    android:paddingBottom=“@dimen/activity_vertical_margin”
    android:paddingLeft=“@dimen/activity_horizontal_margin”
    android:paddingRight=“@dimen/activity_horizontal_margin”
    android:paddingTop=“@dimen/activity_vertical_margin”
    android:orientation=“vertical”
    tools:context=“com.example.test.customradiobutton.MainActivity”>
    <TextView
        android:id=“@+id/tv”
        android:layout_width=“fill_parent”
        android:layout_height=“wrap_content”
        android:layout_marginTop=“30dp”
        android:gravity=“center_horizontal”
        android:textSize=“25dp”
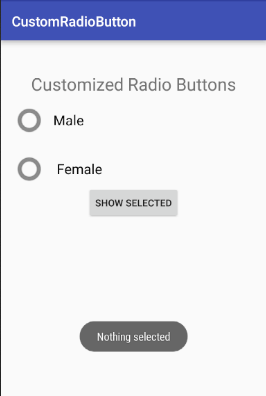
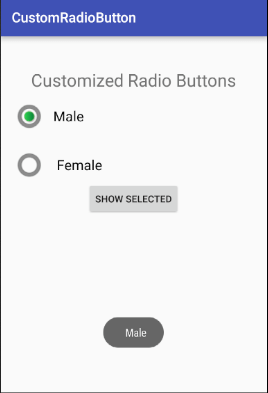
       android:text=“Customized Radio Buttons” />
    <!–   Customized RadioButtons  –>
    <RadioGroup
        android:layout_width=“wrap_content”
        android:layout_height=“wrap_content”
        android:id=“@+id/radioGroup”>
        <RadioButton
            android:id=“@+id/radioMale”
            android:layout_width=“fill_parent”
            android:layout_height=“wrap_content”
            android:text=”  Male”
            android:layout_marginTop=“10dp”
            android:checked=“false”
            android:button=“@drawable/custom_radio_button”
            android:textSize=“20dp” />
        <RadioButton
            android:id=“@+id/radioFemale”
            android:layout_width=“fill_parent”
            android:layout_height=“wrap_content”
            android:text=”   Female”
            android:layout_marginTop=“20dp”
            android:checked=“false”
            android:button=“@drawable/custom_radio_button”
            android:textSize=“20dp” />
    </RadioGroup>
    <Button
        android:layout_width=“wrap_content”
        android:layout_height=“wrap_content”
        android:text=“Show Selected”
        android:id=“@+id/button”
        android:onClick=“onclickbuttonMethod”
        android:layout_gravity=“center_horizontal” />
</LinearLayout>

custom_radio_button.xml

Now implement a selector in another file (custom_radio_button.xml) in drawable and place two different checked and unchecked button images.

File: checkbox.xml

<?xml version=“1.0” encoding=“utf-8”?>
<selector xmlns:android=“http://schemas.android.com/apk/res/android”>
    <item android:state_checked=“true” android:drawable=“@drawable/checkedradiobutton” />
    <item android:state_checked=“false” android:drawable=“@drawable/unchekedradiobutton” />
</selector>

Activity class

File: MainActivity.java

package com.example.test.customradiobutton;
import android.support.v7.app.AppCompatActivity;
import android.os.Bundle;
import android.view.View;
import android.widget.Button;
import android.widget.RadioButton;
import android.widget.RadioGroup;
import android.widget.Toast;
public class MainActivity extends AppCompatActivity {
    Button button;
    RadioButton genderradioButton;
    RadioGroup radioGroup;
    @Override
    protected void onCreate(Bundle savedInstanceState) {
        super.onCreate(savedInstanceState);
        setContentView(R.layout.activity_main);
        radioGroup=(RadioGroup)findViewById(R.id.radioGroup);
    }
    public void onclickbuttonMethod(View v){
        int selectedId = radioGroup.getCheckedRadioButtonId();
        genderradioButton = (RadioButton) findViewById(selectedId);
        if(selectedId==-1){
            Toast.makeText(MainActivity.this,“Nothing selected”, Toast.LENGTH_SHORT).show();
        }
        else{
            Toast.makeText(MainActivity.this,genderradioButton.getText(), Toast.LENGTH_SHORT).show();
     }
    }
}

Output

android Custom Radio Button 1
android Custom Radio Button 2